在 AWS 上面有幾個方式可以架自己的 registry
ec2 container registry
ec2 & s3
以下是簡單的比價結果,可以看出 EC2 Container Registry 上面儲存費用大約是 S3 的 4 倍。
如果在 registry 上不打算放很多大容量的 image 可以考慮直接用 EC2 Container Registry。
但考慮擴充性問題 (X) 手賤想自己架 Server (O),所以嘗試 S3 的方式架設。

在 AWS 上面有幾個方式可以架自己的 registry
ec2 container registry
ec2 & s3
以下是簡單的比價結果,可以看出 EC2 Container Registry 上面儲存費用大約是 S3 的 4 倍。
如果在 registry 上不打算放很多大容量的 image 可以考慮直接用 EC2 Container Registry。
但考慮擴充性問題 (X) 手賤想自己架 Server (O),所以嘗試 S3 的方式架設。
Jenkins on Docker
https://github.com/jenkinsci/docker/blob/master/README.md
***安裝 & 執行
docker run -d –restart=always \
-p 8080:8080 -p 50000:50000 \
-v jenkins_home:/home/ec2-user/jenkins_home jenkinsci/jenkins:lts
docker run -d –restart=always \
-p 8080:8080 -p 50000:50000 \
-v jenkins_home: :/var/jenkins_home jenkinsci/jenkins:lts
設定檔會透過 volume 方式掛在 jenkins_home 底下
可以透過 docker 語法 export 出來
Exports volume
docker cp 5131b88d6713:/var/jenkins_home .
docker cp 5131b88d6713:/home/ec2-user/jenkins_home .
***設定
安裝預設套件
安裝 NodeJS plugin
安裝 Gitlab plugin
安裝 NodeJS plugin
https://plugins.jenkins.io/nodejs
如果專案內需要跑 npm 之類的指令,可以下載 nodeJS plug in
可以在 JENKINS_URL/configureTools 底下設定多個 node 環境。
在專案內 build environnment 選取上面提供的環境。
安裝 Gitlab plugin
https://github.com/jenkinsci/gitlab-plugin/wiki/Setup-Example
延伸閱讀,
如何只在 Archive 的狀況觸發 script?
http://stackoverflow.com/questions/5471396/running-script-only-for-an-archive-build-in-xcode-4
http://stackoverflow.com/questions/15652316/setup-xcode-for-using-external-compiler
建立一個新的 target (External build system)
在 app target 點選 edit scheme,設定 build target,將新產生的 External build system 加進來,並且勾選 archive
在 External build system target 點選 Info,指定 build tool 為 /bin/bash。Arguments 設定指定的 script path, ex: ${SRCROOT}/xxx.sh
http://stackoverflow.com/questions/30547283/submit-to-app-store-issues
http://ikennd.ac/blog/2015/02/stripping-unwanted-architectures-from-dynamic-libraries-in-xcode/
提交到 App store 失敗,因為自己 build framework 裡面有包用不到的平台 (x86)
非常白痴的,因為在模擬器上面需要 x86, 但是提交到 app store 卻強制要拿掉
解法:
在 build run script 加上一段腳本,把所有 framework 拿出來檢查過一次
APP_PATH=“${TARGET_BUILD_DIR}/${WRAPPER_NAME}"
# This script loops through the frameworks embedded in the application and
# removes unused architectures.
find “$APP_PATH" -name ‘*.framework’ -type d | while read -r FRAMEWORK
do
FRAMEWORK_EXECUTABLE_NAME=$(defaults read “$FRAMEWORK/Info.plist" CFBundleExecutable)
FRAMEWORK_EXECUTABLE_PATH=“$FRAMEWORK/$FRAMEWORK_EXECUTABLE_NAME"
echo “Executable is $FRAMEWORK_EXECUTABLE_PATH"
EXTRACTED_ARCHS=()
for ARCH in $ARCHS
do
echo “Extracting $ARCH from $FRAMEWORK_EXECUTABLE_NAME"
lipo -extract “$ARCH" “$FRAMEWORK_EXECUTABLE_PATH" -o “$FRAMEWORK_EXECUTABLE_PATH-$ARCH"
EXTRACTED_ARCHS+=(“$FRAMEWORK_EXECUTABLE_PATH-$ARCH")
done
echo “Merging extracted architectures: ${ARCHS}"
lipo -o “$FRAMEWORK_EXECUTABLE_PATH-merged" -create “${EXTRACTED_ARCHS[@]}"
rm “${EXTRACTED_ARCHS[@]}"
echo “Replacing original executable with thinned version"
rm “$FRAMEWORK_EXECUTABLE_PATH"
mv “$FRAMEWORK_EXECUTABLE_PATH-merged" “$FRAMEWORK_EXECUTABLE_PATH"
done
第一個迴圈去爬所有 framework
第二個迴圈,把 app 所使用的平台放在 $ARCHS。
接著再該 framework 內把該平台給 extract 出來成 FRAMEWORK_EXECUTABLE_PATH-$ARCH
把 extract 出來的在 merge 回去,名稱覆蓋掉。
The chat bot can be break down to two parts:
Facebook message interface integration and Bot engine.
First, create an app on https://developers.facebook.com/apps/
Official quickstart: https://developers.facebook.com/docs/messenger-platform/guides/quick-start/
If the fan page had been created, it could be subscribe by the Facebook app.
http://stackoverflow.com/questions/9265062/how-to-link-a-facebook-app-with-an-existing-fan-page
Tell the engine what your user said, and it tell you what your bot should do next.
Wit.ai(https://wit.ai/) provide a really clean and powerful UI.
Official quickstart: https://wit.ai/docs/quickstart
The intent parser defines lots of intents and entities, ex: location/ date/ url …
We can response hard code answer directly to the entity, or we can query information(weather or news …) and combine the result to your answer.
(http://breezedeus.github.io/2016/05/26/breezedeus-wit-ai-chatbots-generator.html, nice Chinese tutorial)
Sample code of Wit.ai: https://github.com/wit-ai/node-wit
It integrated Facebook messenger in the example/messenger.js.
$ PORT=<PORT> WIT_TOKEN=<WIT_TOKEN> FB_APP_SECRET=<FB_APP_SECRET> FB_PAGE_TOKEN=<FB_PAGE_TOKEN> node messenger.js
WIT_TOKEN: Settings > API Details > Server Access Token
FB_APP_SECRET: Settings > Basic> App secret
FB_PAGE_TOKEN: Product > Messenger > Token Generation, get the page access token with the specific page.
Send request flow:
Browser ——> Facebook fan page ——> Facebook app ——> Own server ——> Wit.ai
Response flow: (excepted WIt.ai async request)
Browser <—— Facebook fan page <—— Facebook app <—— Own server <—— Wit.ai
最近在處理語音辨識,語音回饋,以及與其他 App 如何共通操作 audio session 的問題。
KKbox Zonble 大
https://zonble.gitbooks.io/kkbox-ios-dev/content/audio_apis/audio_session.html
參考上面文章對於 iOS Audio session 有了更深一步的理解。
最重要的核心觀念是 Audio session 裡面的 share instance 指的是該 app 內是共用同一個 instance。
原本誤會是整個 OS 只有一個 instance (哪來這種假想)
每個 app launch 時都會初始化一個 Audio session。
預設的 category 是 AVAudioSessionCategorySoloAmbient
主要的行為有:
更詳細的 category 介紹可以參考上面兩份文件,說的非常清楚。
在我運用的情境裡面,主要是錄製一段使用者聲音,辨識完成之後給出語音回饋。
完成回饋之後要維持原本背景環境的狀況(如果有播放其他app的音樂要繼續播放)
在辨識一開始,把 category 設定成 record,並且 active audio session。
語音回饋時,category 設定成 playback ,全部完成之後把 audio session deactivate.
特別注意一點,在 deactivate 時呼叫
– (BOOL)setActive:(BOOL)active withOptions:(AVAudioSessionSetActiveOptions)options error:(NSError **)outError NS_AVAILABLE_IOS(6_0);
參數設定 AVAudioSessionSetActiveOptionNotifyOthersOnDeactivation,
這樣一來背景播放音樂的 app 才會收到被中斷事件結束,可以繼續原本的工作。
AWS提供免費的憑證服務,在這個憑證貴鬆鬆的年代,對開發者是個很大的福音。
但其實這東西也不是這麼的免費,EC2 上是無法直接使用這個服務的。
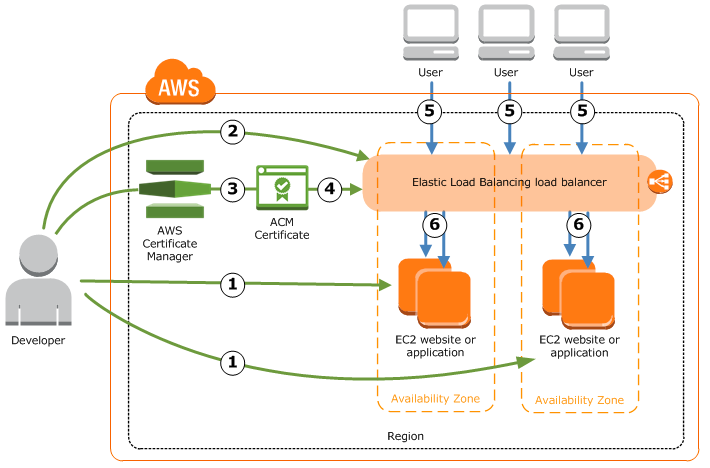 ref: https://docs.aws.amazon.com/acm/latest/userguide/gs-elb.html
需要透過 Elastic Load Balancing(ELB)進行設定。而 ELB 也
是計時收費,再額外加上流量費用。
ref: https://aws.amazon.com/tw/elasticloadbalancing/classicloadbalancer/pricing/
在不爆流量的狀況底下,還是比起其他憑證公司來的便宜,所以選擇了這個方案。
前置:透過 Amazon Certificate Manager(ACM) 申請憑證。輸入自己的網域名稱,會收到系統確認性。
確認成功之後,在 ACM 會出現一組憑證。
假設我們已經有一台跑 web service 的 EC2,就直接申請 ELB。
在新增 ELB 過程,選擇了 classic 方案 (Application load 方案還沒研究)。
下一步驟是設定 port routing,指定 ELB 接受到的 port 要對應送往 EC2 的哪個 port,並且指定傳輸方式。除了預設的 ELB HTTP 80 -> EC2 HTTP 80 之外,別忘了 ELB HTTPS 443 -> EC2 HTTP 80。(這邊採取的作法是 client <-> ELB 加密,至於 ELB <-> EC2 沒有)
接著確認設定正確後就可以新增。在 load balancer 底下的 instance 分頁,可以看見 EC2 運作的情形,
如果 Status 是 InService 那就大功告成啦!
Description 分頁有 ELB 的 DNS name,透過 http or https 連接,都能成功連上。
p.s. 這個 DNS 名稱很醜,需要的話向電信公司申請 domain name,或是透過 Amazon 53 申請。
p.s.2 昨天參加了 Amazon Cloud KATA,改天再來分享 Serverless 架構的心得。
good-coding-instincts-will-eventually-kick-you-in-the-teeth
這篇相同來自碼天狗的文章,文章記錄了筆者 Debug 的心路歷程。光是靠經驗累積,用直覺去 Debug 的能力非常有限,但遵守某些原則則是可以讓自己更容易找到方向,提昇解決問題的能力。
原文:
在 Debugger 發現錯誤訊息之後丟到 google,如果有人討論過的話,就嘗試能不能重製出來。如果自己無法重製的話。檢查所有執行環境,一步步排除差異,直到能重製 bug。
總結:
上面提到的方針,都是把問題盡可能的一步步拆解,直到找到有問題的那一個小部分(這不就是 debug …)。不過知易行難,有些事情容易因為便宜行事,隨隨便便丟到 stack overflow 找一找可能解答,貼一貼解決了就當成沒事。
rietveld 是專門用來作 code review 服務,不包含任何版本控制的功能。
具體的說,這只是一個 code review 的介面。可以透過幾種方式使用:
這裡所說的傳,是指傳遞自己版本控制軟體裡不同 version 或是 branch 的內容。rietveld/upload.py 會把 diff 後的檔案上傳到 rietveld server(看前一個步驟選擇使用哪裡的 server)。這在後面的使用 rietveld 會提到。
老實說這張專輯沒入圍其他獎項蠻讓我訝異的,上一次聽她的專輯要追溯到 2005 《拜金小姐》。
不知道是因為年紀到了,還是陳珊妮的曲風有所變化,在聽到《如同悲傷被下載了兩次》時沒有當初聽拜金小姐那般難以接受,很快的就變成經常播放的專輯之一,陪我度過了無數個加班的夜晚。
陳珊妮的專輯給我的印象總是輕盈自在,在大多數的曲目中都會有輕快的鼓做基底,配合電子琴的輕快伴奏,讓每首歌都能很耐聽。
“星空下我記得" — 是我最喜歡的其中一首。推薦給大家。


